Showing posts with label REFORMATING. Show all posts

Monday, June 7, 2010

on Leave a Comment

Add the Command Prompt to the Windows Explorer Right-Click Menu

Add the Command Prompt to the Windows Explorer Right-Click Menu

A hidden functionality in Windows allows you to right click on a directory, and select “Command Prompt Here” from the menu.

Here’s the registry hack to get this working. Make sure you back up your registry just in case. I’ll show you the step-by-step method, but you can skip down to the bottom for the alternate reg file.

Step-By-Step Method:

Type regedit.exe into the Start\Run dialog, and then navigate to the following registry key:

HKEY_CLASSES_ROOT\Directory\shell

Once you are at that key, right click and choose the New Key option:

Name the key “CommandPrompt” without the quotes and then double-click on the default value. Change the text to “Command Prompt Here” as seen here:


Right click on the new Command key and select New key, as you did before. Name the new key Command as well, and then double-click the default value of that key. Set the text of that key to this:

cmd.exe /k cd %1
You can see what it should look like here:

Now when you right click on the folder, you should see this dialog:

That will open up a prompt like this:

Alternate method:

You can create a text file named anything.reg, and insert this text into it:

Windows Registry Editor Version 5.00
[HKEY_CLASSES_ROOT\Directory\shell\CommandPrompt]
@=”Command Prompt:”
[HKEY_CLASSES_ROOT\Directory\shell\CommandPrompt\Command]
@=”cmd.exe /k cd %1″


Double click on that file, and the text will be entered into the registry, and you’ll have the same right click command prompt.
on Leave a Comment

Disable those annoying "X Application has Encountered a Problem and Must be Shut Down" messages in Windows XP

Disable those annoying "X Application has Encountered a Problem and Must be Shut Down" messages in Windows XP

It’s frustrating enough when your application crashes. Then the annoying dialog expects you to “Send an Error Report to Microsoft”. As if I want Microsoft to know exactly which programs I’m running on my computer.

Here’s two ways to turn off that error reporting. First, you can Right-Click on My Computer, go to the Advanced Tab, and choose the “Disable error reporting” option.


Alternatively, you can navigate to the services console in Administrative tools, find the Error Reporting Service, go into properties and disable it. Either way, those annoying dialogs are gone!
on Leave a Comment

Disable Fast User Switching on Windows XP


Fast User Switching is a way for users to quickly switch between accounts without having to fully log off. This is just one more service that doesn’t really need to be started.

•Navigate to the Services console in Administrative tools.
•Double-click on Fast User Switching and change Startup Type to disable.
•Hit the Stop button if the service is started, and then hit OK.
One more unnecessary service stopped.
on Leave a Comment

writing colourful names of folder

[{BE098140-A513-11D0-A3A4-00C04FD706EC}]

iconarea_text=0x00F007aa


copy this code in notepad and save as desktop.ini

and put the file in any drives folder name will be change

edit 0x00F007aa to switch to different colour.
on Leave a Comment

Change My documents location in xp

I think many of you don't know about this fact that the storage location of "My Documents" can be changed. Its is safe , when crash or need to be formatted
Normally windows save the "My Documents" folder on your C-drive. But when you right-click on it and go to properties, you can change the location where you want windows to save your Documents folder.

Steps

1.Right-click on My documents

2.Go to properties

3.Change your location

This can be very useful when If windows hangs or become crupt and you have to format your C-drive again,Then you documents will not be lost due to formating.
on Leave a Comment

Change the Default Location for Installing Programs

AS you know XP uses the C:\Program Files directory as the default base directory into which new programs are installed. However, you can change the default installation drive and/or directory by using a Registry hack. Run the Registry Editor and go to


HKEY_LOCAL_MACHINE\SOFTWARE\Microsoft\Windows\CurrentVersion.


Look for the value named ProgramFilesDir.


By default, the value will be C:\Program Files.


Edit the value to any valid drive or folder;


Now XP will use that new location as the default installation directory for new programs.This registry hack can be very useful when your c drive is full and you automatically want to change the installing directory.Enjoy this cool windows registry hack

Sunday, May 23, 2010

on Leave a Comment

Change "StandBy" Button to "ShutDown" Button in Vista


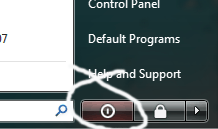
When you click the Windows 7 Start button you will see an actual "Shut Down" button rather than a cryptic icon- an icon that in Vista, puts your system to sleep instead of turning it off. But you can change the icon's function. Here's how.

1. Click Start, type Power Options, and press [Enter]
2. Click Change plan settings for you selected power plan, and then click Change advanced power settings.
3. Expand, first, the "Power buttons and lid" tree, and then the "Start menu power button" tree.
4. Change the setting from Sleep to Shut Down.
5. Click OK; close the remaining windows.

Now, when you click Vista's little Power icon in the Start menu, it will truly Shut Down your Computer.


If the post was helpfull then please comment.
Powered by Blogger.

Blogroll

SOFTWARES

About

mix

About

TRICKS